
Arches are cool. Millions of years of wind erosion, soft rock, and what seems like a good bit of luck combine to create these famous geological landmarks that are literally one of a kind. Some of the most famous sandstone arches in the world are contained within Arches National Park, and I recently got the chance to travel out west to explore that area with two of my good friends, Mike and David (see this post for background).
For a post about Arches NP, I thought I’d change it up with a step-by-step look at how some of the night photos (or wide-field astrophotography) happened.
At times this post will devolve into photo-nerd-speak, so if your eyes glaze over when that happens, try less reading and more looking at pictures 🙂

The arch you see above (which also happens to be on Utah’s license plate, so it’s clearly cool) is called Delicate Arch. The late afternoon light is nice and warm, but most visitors to the park see essentially this same scene. The arch (and the surrounding area) is also really BIG. Note the guy in the upper left corner above – he was about a quarter of the way to the arch itself.
The size, geography, and popularity of Delicate Arch makes it tough to get a particularly interesting or different photo – but maybe night time could be just the ticket… More on that later…
Double arch is another popular feature, and it was there (around midnight) we experimented with a variety of night-lighting styles. Eventually we settled on the right-most frame below, because the two small light sources lighting the rock from beneath really brought out the texture and detailed features of the rock.
The light-painted frame in the middle below was painted from the camera position which results in pretty flat (read: boring) lighting. In retrospect, if needed, we probably could have light painted from the side or below the arch to spice that middle frame up a bit…. but that didn’t occur to us at what was probably 2AM in the morning.
The two strobes (nerd alert) were gelled with a 1/2 CTO to warm them from daylight balanced (~5500K) to something resembling the flashlight used for light painting, (~3800K). White balance was always set on daylight. You are photographing stars, after all.

After waiting for those pesky low clouds to disappear, then combining the right-most frame, with about 100 more of the left-most (a tutorial for another day), we’re left with this:

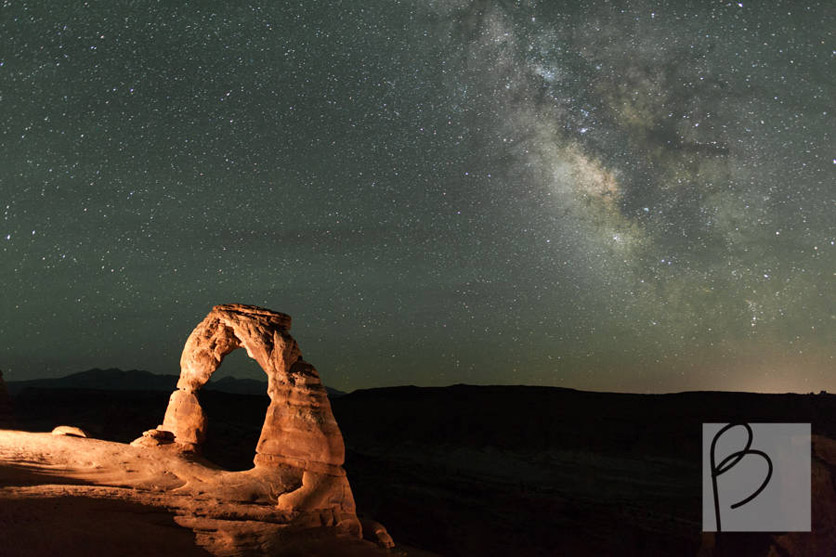
OK, so back to Delicate Arch. At 1AM. 1.5 miles from the trailhead. It’s a New Moon. The milky way is GORGEOUS and easily visible to the naked eye. Here’s a purely ambient exposure:

Next step: add a main light to side-light the arch from camera left, triggered from the camera position, a couple hundred feet away. For testing the flash, I cut the shutter speed to about 5 seconds, thus the stars are several stops under exposed, but my ISO and aperture have stayed fixed so that the flash exposure will not change when I later extend the shutter.

Next we added some fill light for definition… This second flash was on half power, and also about 50% farther away from the arch than the main. I should have gobo’ed the fill flash, since it’s just outside of the frame and causing the flare you see on the right hand side. Instead (since the flash is 200 feet away and down a steep sandstone bowl) I just tilted the camera a bit.

Add back the ambient starlight (back to a 25 second exposure) and poof:

That frame above is a single, 25 second long exposure. As in: exactly what you see above appeared on the back on my camera LCD. It was now 3AM, and we were ecstatic.
We put the camera(s) on drive mode, 25 seconds per frame, held down the shutter with the corded remote, and two hours later (plus some photoshop blending mode magic) we get this:

The star trail above is a composite of about 200 images. We took many, many more, but my computer already hates me enough for using 200 so I stopped at that. The foreground is a combination of two different exposures, one frame contained the light trail from our head lamps, and the other where we flashed the strobes manually from the trigger in my outstretched hand. That one flash lit the arch, Mike and myself.
We weren’t completely nocturnal during our time in Arches, although David would have you believe it. Here are a few more of the sights, in no particular order:


I’d just like to point out the different levels of energy here in this next pair of photos, taken moments apart… David is really just taking it all in. 🙂
 |
 |
A good shot of how steep the sandstone around the arch is…


Where’s Waldo Mike in this enormous panorama? Come on, he’s in a yellow shirt, it can’t be that hard…

Zoomed in view of the same shot … it really is amazing the amount of resolution you can build up in a panorama!


Annnnnd one last night shot, looking straight up at Delicate Arch:

That’s all for now… questions? comments? Did any of that make sense? 🙂 Let me know!
– BH
Leave a Reply